How do I set up Microsoft Entra ID (OIDC) single sign-on?
Thanks for your interest in setting up single sign-on (SSO) for your organization with Microsoft Entra ID (formerly Azure Active Directory)!
CaterCow supports SSO through OpenID Connect (OIDC), the standard authentication protocol built on top of OAuth 2.0. Once it's configured, your team signs in to CaterCow with their existing Microsoft work or school account — no separate CaterCow password to manage.
1. Requirements
- Admin access to your Microsoft Entra ID tenant. You'll need one of the following roles to register an application and grant consent:
- Cloud Application Administrator
- Application Administrator
- Owner of the application's service principal
- Your CaterCow organization must be configured for SSO by CaterCow Support (see Step 1 below).
2. Supported features
- Service Provider (SP)-Initiated SSO — the sign-in flow starts when a user attempts to log in from CaterCow. CaterCow redirects them to Microsoft Entra ID to authenticate, then back to CaterCow once they're signed in.
- Automatic user provisioning on first sign-in — when someone from your organization logs in via Entra for the first time, CaterCow creates their account from the identity Entra returns.
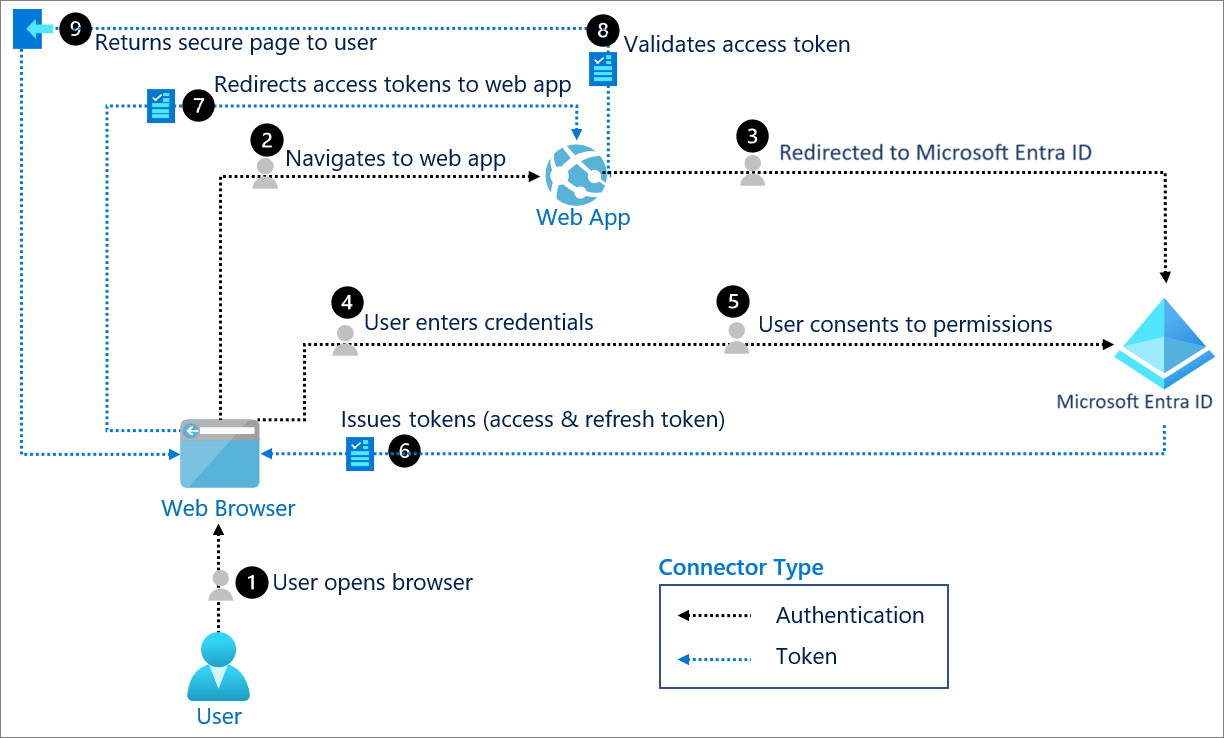
3. How the sign-in flow works
When a user logs in, CaterCow hands authentication off to Microsoft Entra ID and trusts the result. At a high level:
- The user enters their work email on the CaterCow login page.
- CaterCow recognizes the email's domain and redirects the user to Microsoft Entra ID.
- The user signs in with their Microsoft credentials (and consents to sharing their basic profile the first time).
- Entra redirects the user back to CaterCow, which signs them in.
You don't need to understand the protocol in depth to set this up — the steps below walk you through everything.
4. Setup steps
Step 1: Ask CaterCow to enable SSO for your organization
Click Message CaterCow Support at the bottom of this page and let us know you'd like to enable Microsoft Entra SSO for your organization. We'll configure your account and confirm when you're ready to move on to Step 2.
Note: Until we've configured your account, you won't see the Enterprise Settings option inside CaterCow. Please wait for our confirmation before continuing.
Step 2: Register a CaterCow application in Microsoft Entra ID
- Sign in to the Microsoft Entra admin center.
- Navigate to Entra ID.
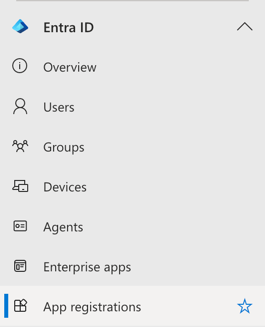
- Go to App registrations, then select New registration.

- Enter a Name for the application (for example
CaterCow), and under Supported account types select Accounts in this organizational directory only. - Under Redirect URI, select the Web platform and enter the callback URL below, then select Register:
https://www.catercow.com/authenticate/auth/dynamic_enterprise_okta/callback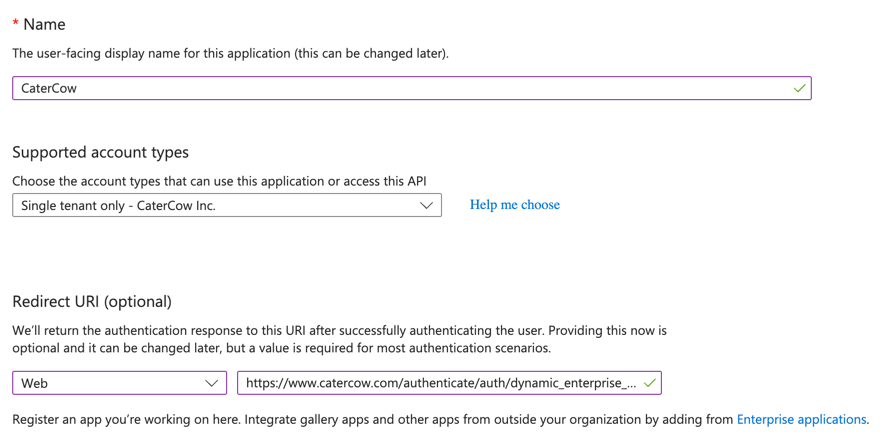
Note: The word "okta" appears in the callback URL for historical reasons — it's the same endpoint CaterCow uses for every OIDC provider, including Microsoft Entra. Enter it exactly as shown.
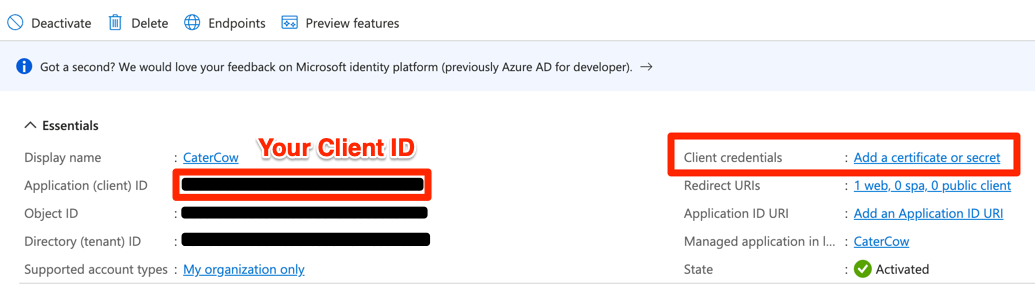
Step 3: Add a client secret
- From your app registration's Overview page, select Add a certificate or secret (this opens Certificates & secrets).
- Select New client secret, add a description, and choose an expiration period.
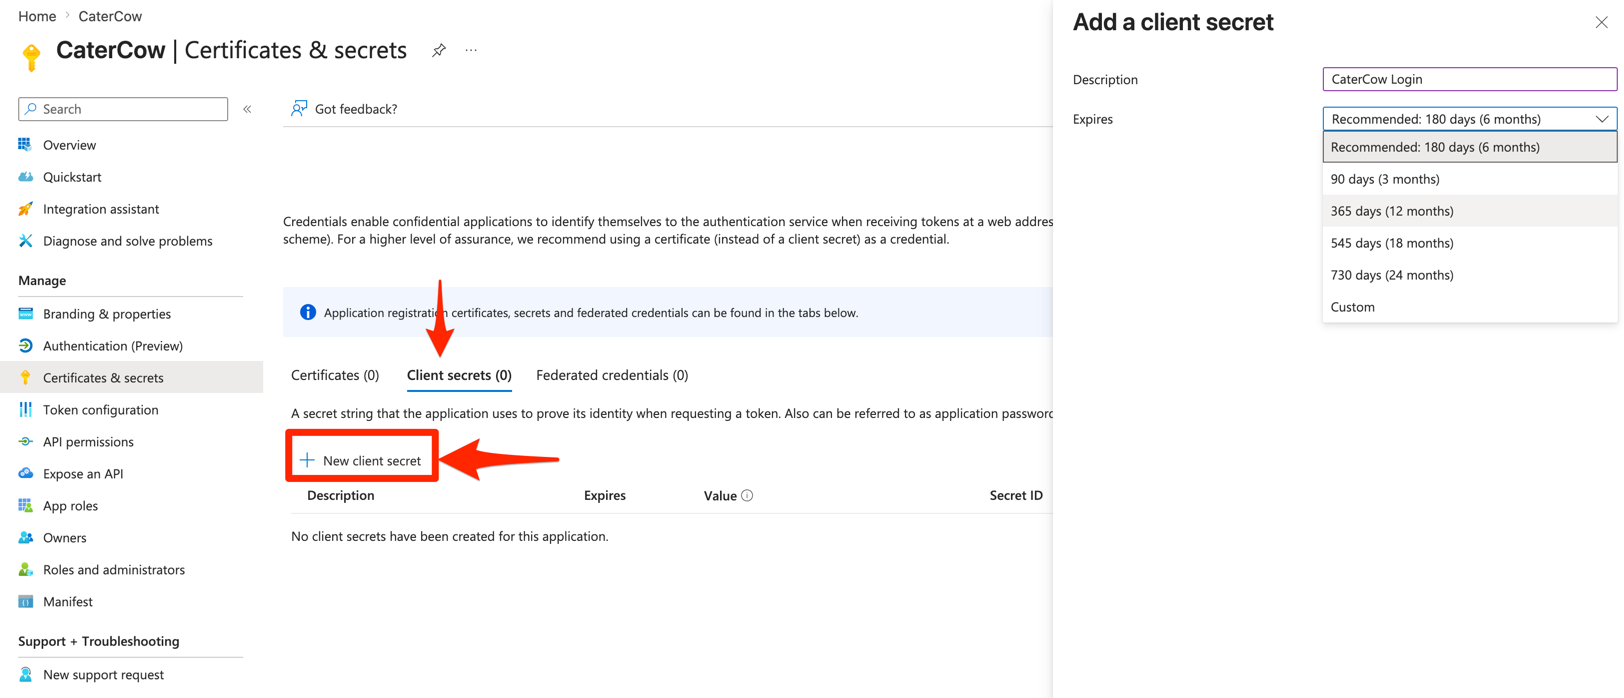
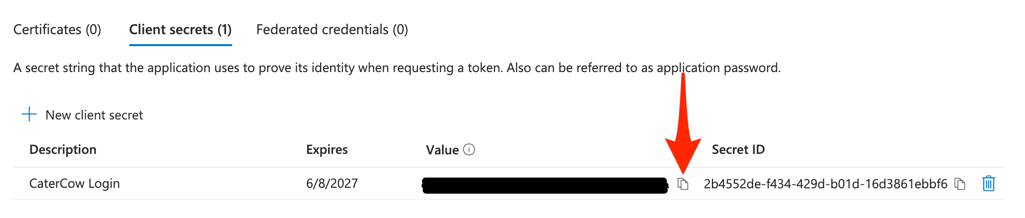
- Select Add, then immediately copy the secret Value — Entra only shows it once. You'll paste it into CaterCow in Step 6.
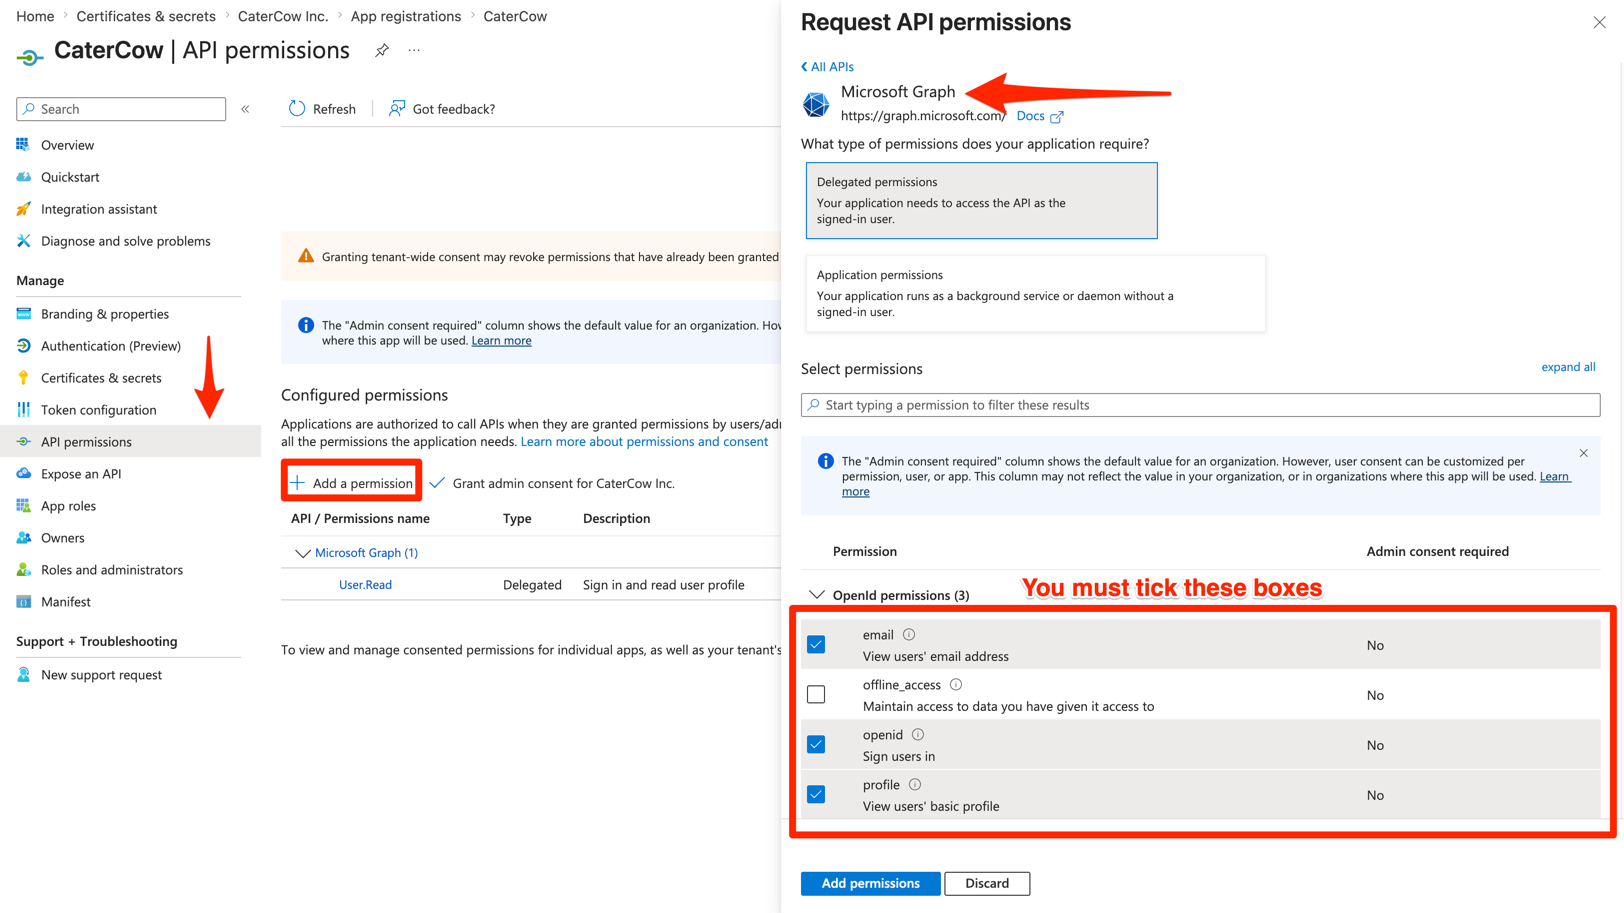
Step 4: Configure API permissions
CaterCow needs to read the signed-in user's basic identity (their unique ID, email, and name).
- Go to API permissions.
- Select Add a permission → Microsoft Graph → Delegated permissions.
- Add the following permissions:
- openid
- profile
- If your tenant requires admin consent, select Grant admin consent for your tenant.
Step 5: Gather your configuration values
From your app registration's Overview page, note the following:
| Value in Entra | What you'll enter in CaterCow |
|---|---|
| Application (client) ID | Client ID |
| Client secret from Step 3 | Client Secret |
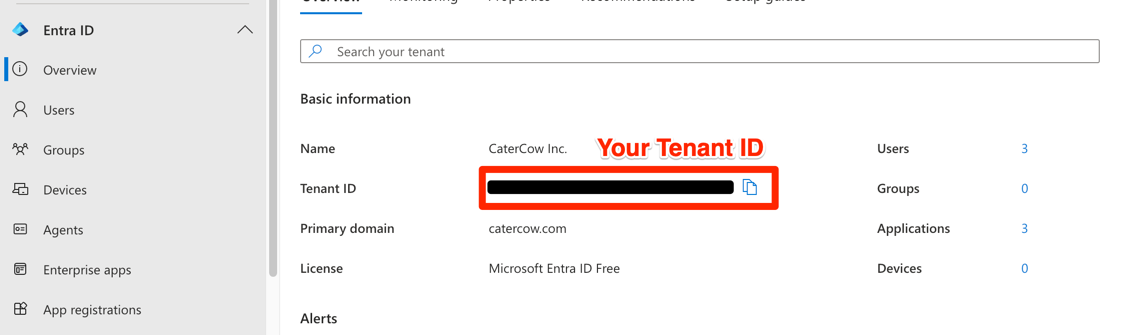
| Directory (tenant) ID | Used to build your Issuer URL (below) |
You'll find your Directory (tenant) ID on the app registration's Overview page:
Your Issuer URL is:
https://login.microsoftonline.com/<your-tenant-id>/v2.0
Replace <your-tenant-id> with your Directory (tenant) ID. For example, if your tenant ID is 00000000-1111-2222-3333-444444444444, your issuer is:
https://login.microsoftonline.com/00000000-1111-2222-3333-444444444444/v2.0
Step 6: Enter your settings in CaterCow
- Log in at https://www.catercow.com/login.
- From the top-right drop-down menu, click Manage Organization.
- Click Settings.
- On the Enterprise Settings page, under SSO, click Update SSO Settings.
- On the Update SSO Details form, fill in the values you gathered in Step 5:
- Provider: select Microsoft Entra
- Issuer URL
- Client ID
- Client Secret
- Click Submit.
- Wait 1 full minute for the changes to take effect, then log out and return to https://www.catercow.com/login to test.
Note: For your security, the form never displays your current SSO values — the fields are always blank. To change any single value later, re-enter all four fields.
5. Logging into CaterCow with Microsoft Entra
Once SSO is set up, users sign in like this:
- Go to https://www.catercow.com/login.
- Enter your work email address.
- Click Log in with SSO.
- Sign in with your Microsoft account when redirected to Microsoft Entra ID.
6. Notes
- Once SSO is enabled, users with an email on your organization's domain can only sign in through Microsoft Entra. Existing CaterCow passwords, as well as "Sign in with Google" and "Sign in with Apple," will no longer work for those users.
- If you rotate or replace your client secret in Entra, return to Enterprise Settings → Update SSO Settings and re-submit the form (all four fields) in CaterCow — otherwise sign-in will start failing once the old secret expires.
- Changes to your SSO settings take about 1 minute to propagate. If a setting doesn't seem to take effect, wait a minute and try again before troubleshooting.
7. Troubleshooting
- Redirect URI mismatch: The redirect URI in your app registration must exactly match the callback URL in Step 2. Even a trailing slash difference will cause sign-in to fail.
- Invalid client secret: Make sure you copied the secret Value (not the Secret ID) and that it hasn't expired.
- Users can't be found / consent errors: Confirm the openid, profile, and email permissions from Step 4 are added and that admin consent has been granted if your tenant requires it.
Still stuck? Click Message CaterCow Support at the bottom of this page — we're happy to hop on a call with your IT admin to get it working.